
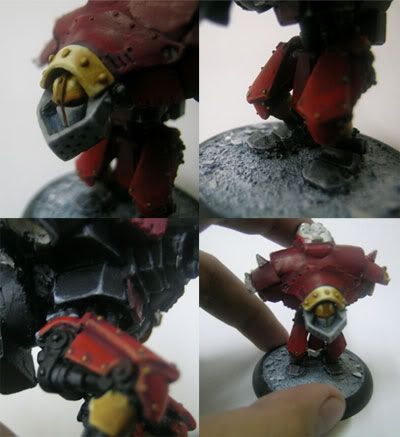
Here are some more pics of my Khador Destroyer. Of course I haven't glued on the arms yet since it'll be hell to paint the details of the undercarriage with the arms in place.
Preparing the model
After thoroughly washing and brushing the parts, I cut a portion from the 50mm base to fit the metal slot that served as the model's mount. The Destroyer comes in 6 bits - the lower portion of the body which is from the waist down, the head, the right arm with the executioner axe, the left arm with the bombard cannon, the front half of the torso and the rear half of the torso. After filing off the flash and other unwanted residue, I prepped up the legs onto the base.
Tools used: Exacto (spell check) knife, Quiktite super glue, miniature file set
Difficulty: 3 of 5
Basework
After setting the legs, I brushed on some watered-down PVA glue (that's the typical Elmer's glue we get locally) onto the base. It was hard when I got to the space between the feet, since I didn't want to paint on any glue onto the model. Then I dipped it onto some sand mixed with some crushed eggshell. Yep, ladies and gents, this hobby doesn't have to be uber-expensive. Those large fragments you see are tiny bits of eggshell.
While waiting for it to dry, I got to watch my SE7EN DVD (which was starting to gather dust at home). It was a good thing, too, because I needed the base to be completely dry before painting over it.
Tools used: Old paintbrush, PVA glue, beach sand (thanks Kage ^_^) mixed with crushed eggshell (crushed, not pulverized)
Diffidculty: 2 of 5
The Torso (aka The Dreaded Khadoran Gap)
Man, what they say is true! When you clap on the two halves of the torso together, there will be a gap no matter what you do. I had to do something about it.
I used Liquid Nails to hold both halves of the torso together. Ah yeah, industrial strength adhesive. Can't go wrong there ^_^
After the Liquid Nails set, I mixed together some epoputty and smoothed it onto the model to cover the gap. I covered it pretty well. One good tip which I will reiterate is to keep a cup of water nearby when working with putty. Keep your fingers wet while sculpting. It not only keeps the crap off your hands, but it also keeps as little fingerprints on the putty as well.
By this time, I also superglued on the Destroyer's head and primed the arms with Smelly Primer (it doesn't actually smell THAT bad BTW).
Tools used: Liquid Nails, Quiktite superglue, Epoputty, water, Smelly Primer
Difficulty: 5 of 5 (goddamn hurt my fingers)
Painting the base
I started off with some Chaos Black. Once that was done, I did over with some Space Wolves Grey. It still didn't look like snow to me so I went on and drybrushed Skull White. I wanted the gritty walking-on-snow effect on the Destroyer so I drybrushed some of the white onto the model itself. Came out pretty well actually.
At this point, I superglued on the top half of the model.
Tools used: Large area brush, large drybrush, small drybrush, Chaos Black, Space Wolves Grey, Skull White
Difficulty: 1 of 5
Bring on the pain!
I primed the whole model white, as opposed to the usual method of priming it black. You need to prime the model so that the paint you slap on later with stay on more evenly. This is especially true with metal miniatures.
For the majority of the model, I based it with Scab Red. Then I progressed with Red Gore and finally Blood Red. To bring out the shading, I mixed the Blood Red with Bubonic brown and progressed that onto the model as well. And to mute the yellow of the Bubonic Brown, I washed down the whole thing further with watered-down Blood Red.
For the blacklining effects, I mixed Blood Red with Ultramarines blue and watered it down. I used a size 0 brush and dabbed it onto the recesses of the model. If you want to do some fast shade work, add some blue to your primary color to darken it. There's always blue in dark colors ^_^
I used black metal (since I was going for NMM) instead of the usual silver/grey/metallic. I settled with picking out the highlights with Codex Grey, then progressed the highlights by adding Skull White. And muting it down with watered Chaos Black to kill the glare.
For some solid metal parts like the model's face guard, I brushed on Codex Grey and progressed with Skull white, but this time onto the whole surface area (not just the highlights).
For the face (you can't see it on the pics though), it's supposed to be lit up. I used the picture on the box as reference. So I started with Fiery Orange and built up to Golden Yellow. I might put in some OSL effect afterwards.
For the gold, I started with Snakebite Leather, then progressed to Bubonic Brown and finally Skull White. Yep, I'm going NMM, baby!
Tools used: lotsa brushes, lotsa paint, lotsa time, lotsa effort
Difficulty: 4 of 5
+++
And as a bonus, I included my hand there in the pic for size reference. I hope my eyes don't give up on me anytime soon. I still have a shitload of stuff to paint at home ^_^


4 comments:
kim, saan ka nakabili nung liquid nails?
Kyameel - you can start with Jojo's models ^_^
Emp - sa mga big hardware stores like sa mga mall merong Liquid Nails. Yung saken sa Galleria ko nabili.
oooo... more modelling tips!
keep the posts flowing sir kim!
linking you up.
LOL kyameel ^_^ Well, two of the top class model painters in our world ARE WOMEN! (Google up Victoria Lamb and Jen Haley)
Post a Comment